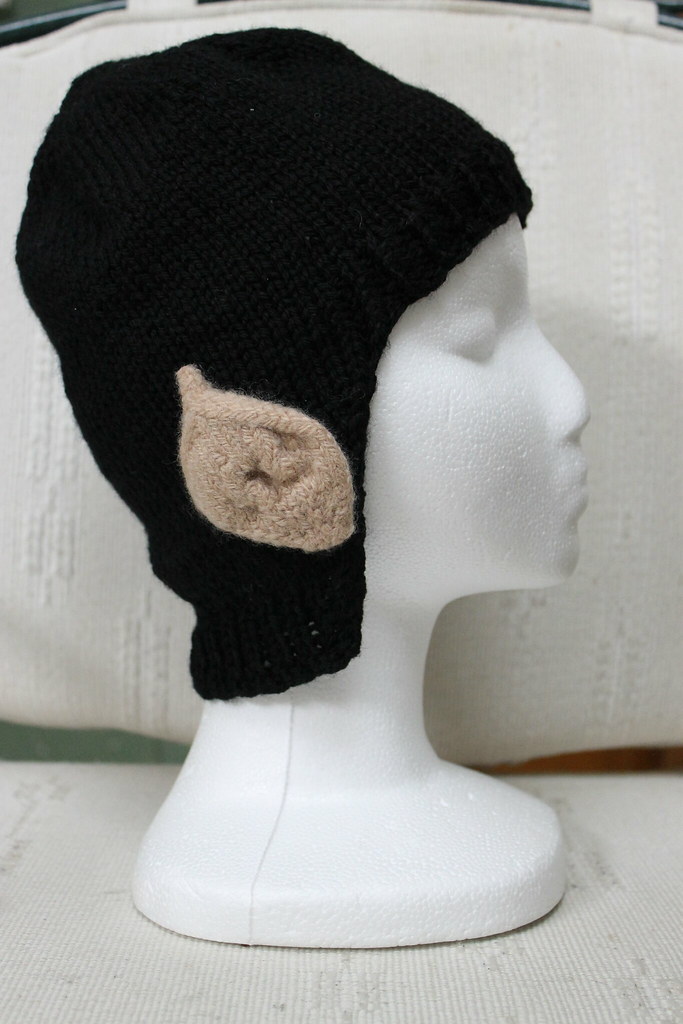
A friend's teenage daughter has been asking for a "Spock Hat" for over a year. Since she asked (very nicely) again at Christmastime, I figured it wasn't a fad that was going to go away, so I thought I'd make one up for her. (It takes me back to being a huge Spock fan when I was her age.)
Note: If you want elf "hair" rather than a Vulcan hat, substitute any other colour for the black yarn.
Links to images for a look at the ear shaping.
* costuming
* neural stimulator
* Quinto ears
________________
The Hat (Knit from top down)
Yarn: Nashua Handknits Creative Focus Superwash (worsted weight), Colour 30 (black)
Needle: US 6 (4 mm) circular needle
Turkish cast-on two stitches on each needle. (Or use your favourite way to start a top down hat.)
Note: Images of the cast-on below are with the yarn I used for the ears, as it's the same beginning, and it's much easier to see light-coloured yarn than black yarn in photos.

Create a magic loop, then, using both ends of the yarn, knit all 4 stitches. (4 stitches around)

Because you used both ends of the yarn, you'll have 8 loops on the needle. Knit all loops as stitches (8 stitches around).

Place a marker at start of round.
Knit 1, YO, all around (16 stitches around)
Knit 1, KTBL the YO (16 stitches around)
(Note: KTBL the YO means knit through back loop of that yarn-over stitch)
K2, YO, all around (24 stitches around)
K2, KTBL the YO (24 stitches around)
K3, YO all around (32 stitches around)
K3, KTBL the YO (32 stitches around)
Continue increasing until you're at K10, KTBL the YO (88 stitches around)
Note: it's easy to manipulate the stitch count if you're using thinner or thicker yarn, or knitting for a child. Just increase to 64, 72, 80, or 96 stitches, instead of 88 stitches around.
Knit for 3 inches (2–2.5 inches if you're making this for a small head or a child)
___________________
Ribbing the front of the hat for the "bangs"
Here's a side view of the bangs.

**
Two stitches before marker, K1 P1
From marker, K1 P1 for 25 stitches
Place second marker
K1 P1, then knit rest of round to two stitches before first marker.
Repeat from ** for one inch
___________________
Bind off the bangs (see note on experimental bindoff below)
After one inch of front ribbing:
Two stitches before marker, K1 P1
From marker, bind off 25 stitches, ending at second marker.
Remove both markers.
K1 P1, Knit to two stitches before end of the row, P1 K1.
From here, you'll work the back of the hat as a flat piece, not in the round.
___________________
Knit the back of the hair
And here's a closeup of the back of the head, showing the shaping of the hairline.

**
P1 K1, Purl to last two stitches, K1, P1
K1, P1, SSK, knit to last four stitches, K2tog, P1, K1
(The "hair" angles backwards, with two stitches being decreased every other row.)
Repeat from ** for two inches. You will have 49 stitches on the needle.
___________________
Begin ribbing for bottom of "hair", to reduce stockinette curling
K1, P1, SSK, ** P1 K1 ** (repeat between ** ) to last 4 stitches
Last 4 stitches are K2tog, P1, K1
P1, K1, repeat to end
K1, P1, SSK ** K1 P1 ** (repeat between ** ) to last 4 stitches
Last 4 stitches are K2tog, P1, K1
P1, K2 ** P1 K1 ** (repeat between ** ) to last 3 stitches
Last 3 stitches are K2, P1
Repeat ribbing stitches for one inch (approx 6 rows)
Bind off.
One more side view photo of the hat.

___________________
Stretchy bindoff
You can bind off normally, or if you'd like to try a stretchy bindoff, here's my experimental bindoff for this project. It's a combination of the regular bindoff and the lace bindoff.
1. Knit two, slip both stitches back to left needle, K2tog
2. Knit 1, Pass rightmost stitch on left needle over the first stitch
3. Knit one, slip both stitches back to left needle, K2tog
Repeat 2 and 3 above
___________________
Pointy Ears
Yarn is Purelife organic wool, in "onion", or equivalent feltable wool. This is a DK weight yarn as I wanted the ears to be a little lighter weight. You can substitute worsted weight yarn but the ears will be just a wee bit heavier on the hat. You may also have to fudge your row count by one or two rows, or felt the yarn a little bit more.
Needles I used: US 6 (4 mm)
**Pattern**
Using the Turkish cast-on, make 4 stitches, 2 on each side of your circular needles.
Basic principle: increase to 11 stitches on back of ear; increase to 20 stitches on front of ear
There are 32 rows from the bottom to the top tip of the ear.
It takes 12 rows to build from the bottom to the middle of the ear, then 12 rows to decrease for a regular human ear shape, then 8 rows to build the pointy tip.

The extra stitches in the "front" of the ear are to create extra fabric for shaping into an ear whorl.
My increase chart (yours may vary depending on your row gauge. Remember, your goal is just to get a lot more fabric on the front of the ear, and let the back of the ear control the shape.)
| Row | Back # of stitches | Front # of stitches |
| 2 | 4 | 6 |
| 4 | 5 | 8 |
| 6 | 6 | 11 |
| 8 | 8 | 14 |
| 10 | 9 | 17 |
| 12 | 11 | 20 |
| 14 | 10 | 18 |
| 16 | 9 | 16 |
| 18 | 8 | 14 |
| 20 | 7 | 12 |
| 22 | 6 | 9 |
| 24 | 5 | 6 |
| 26 | 4 | 4 |
| 28 | 3 | 3 |
| 30 | 2 | 2 |
| 32 | 1 | 1 |
RIGHT EAR
Increases on front are K to one stitch before end, M1, K1, on most rounds. You can also M1 in the middle of the ear after row 4.
Increases on back are K1, M1, K to end (no increases on alternate rows).
Here's the back of the year, at the midpoint.

And here's the front of the ear. You can see all the extra fabric bulging upwards.

Decrease rows on front for rows 14-24 are:
SSK, K to last 3 stitches, K2tog, K
Decrease rows on back for rows 14-24 are:
K to last 3 stitches, K2tog, K
As you get past row 24, alternate k2tog or ssk to shape the final point.
Here's the back of the ear, so you can see the shape.

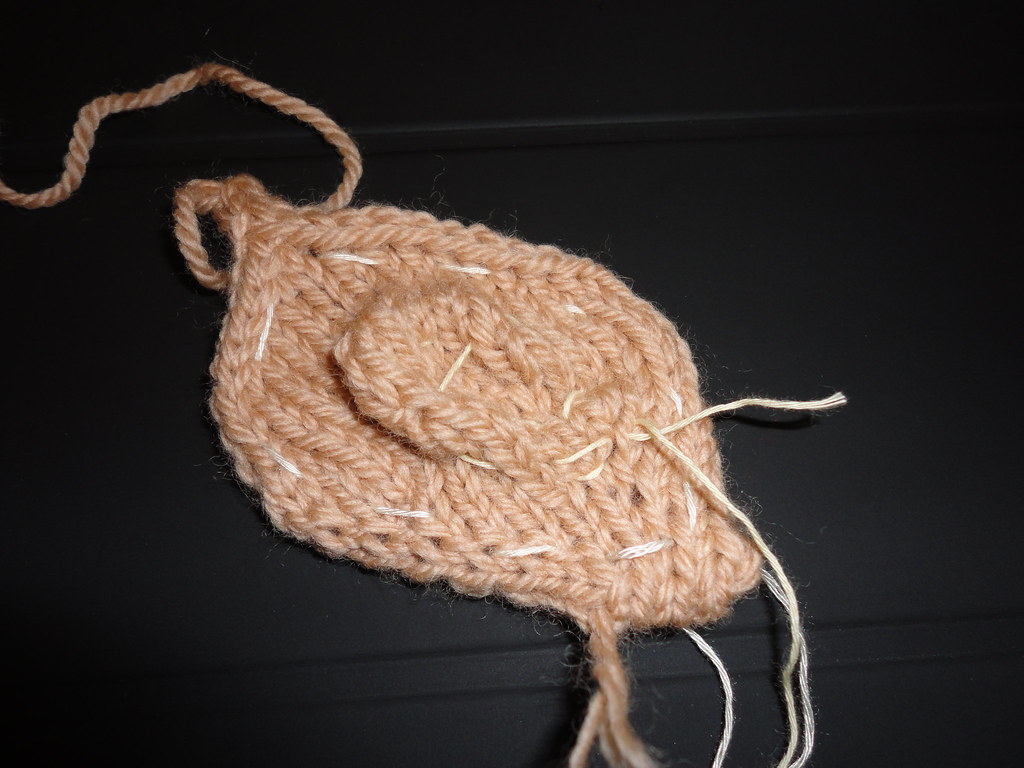
And here's the front of the ear, with a little shaping of the ear whorl.

LEFT EAR
Increases on front are K1, M1, K to end, on most rows. You can also M1 in the middle of the ear after row 4.
Increases on back are K to one stitch before end, M1, K1 (no increases on alternate rows)
Decrease rows on front for rows 14-24 are:
SSK, K to last 3 stitches, K2tog, K
Decrease rows on back for rows 14-24 are:
K to last 3 stitches, K2tog, K
As you get past row 24, alternate k2tog or ssk to shape the final point.
___________________
FINISHING
After bindoff, baste the ear shaping into place.
With fingering or lace weight cotton or acrylic yarn (not sewing thread, which may cut the yarn, and not wool yarn, which may felt itself to the wool of the ear), sew the edges together to secure the ear shaping.
Then manipulate the extra fabric in the front of the ear into a whorl that approximates the inner shape of an ear, and baste that shape into place with the cotton yarn. (See above photo. You only need to build up about 1/4 inch of ear whorl.)
Make two ears, one which mirrors the other. Learn from my mistake and make them at the same time if at all possible, as it's much easier to remember your construction.
Put into hot laundry wash and dry to felt the ears. Bonus points: Ask your husband to "find your ear" when he brings up the laundry basket.
Here are two ears together, one pre-felting, and one that's been felted down.

Put hat on, and then attach ears to hat in approximate location of your own ears.
Sew in ends.
Wear with geek pride.